Sunday, March 23, 2014

Wicking Garden Bed

Joseph has two raised garden beds. (Some blogs here and here).

He recently informed me that he wanted to move one. I don't know why, I just do as I'm told (well, that's not really true...but I don't mind helping my Love with his projects since he is so wonderful at helping me with mine).

Since he was moving it anyway, he informed me he wanted to turn it into a Wicking Garden Bed.

Basically, you water it from the bottom and it wicks up. Sounded kind of weird to me, but J assured me that it is superior to watering it the regular way.

The things my dirt nerd decides he's going to do. I love it.

Here's one of the online websites that shows you how to build it:
http://www.mvcc.vic.gov.au/for-residents/environment-programs/my-smart-garden/~/media/Files/ForResidents/Environment/My%20Smart%20Gardens/Wicking_Bed_Fact_Sheet_Feb%202012.ashx


 The pile of dirt there is where the garden box used to sit, next to the other garden box.

 The box's new home, next to the shed.


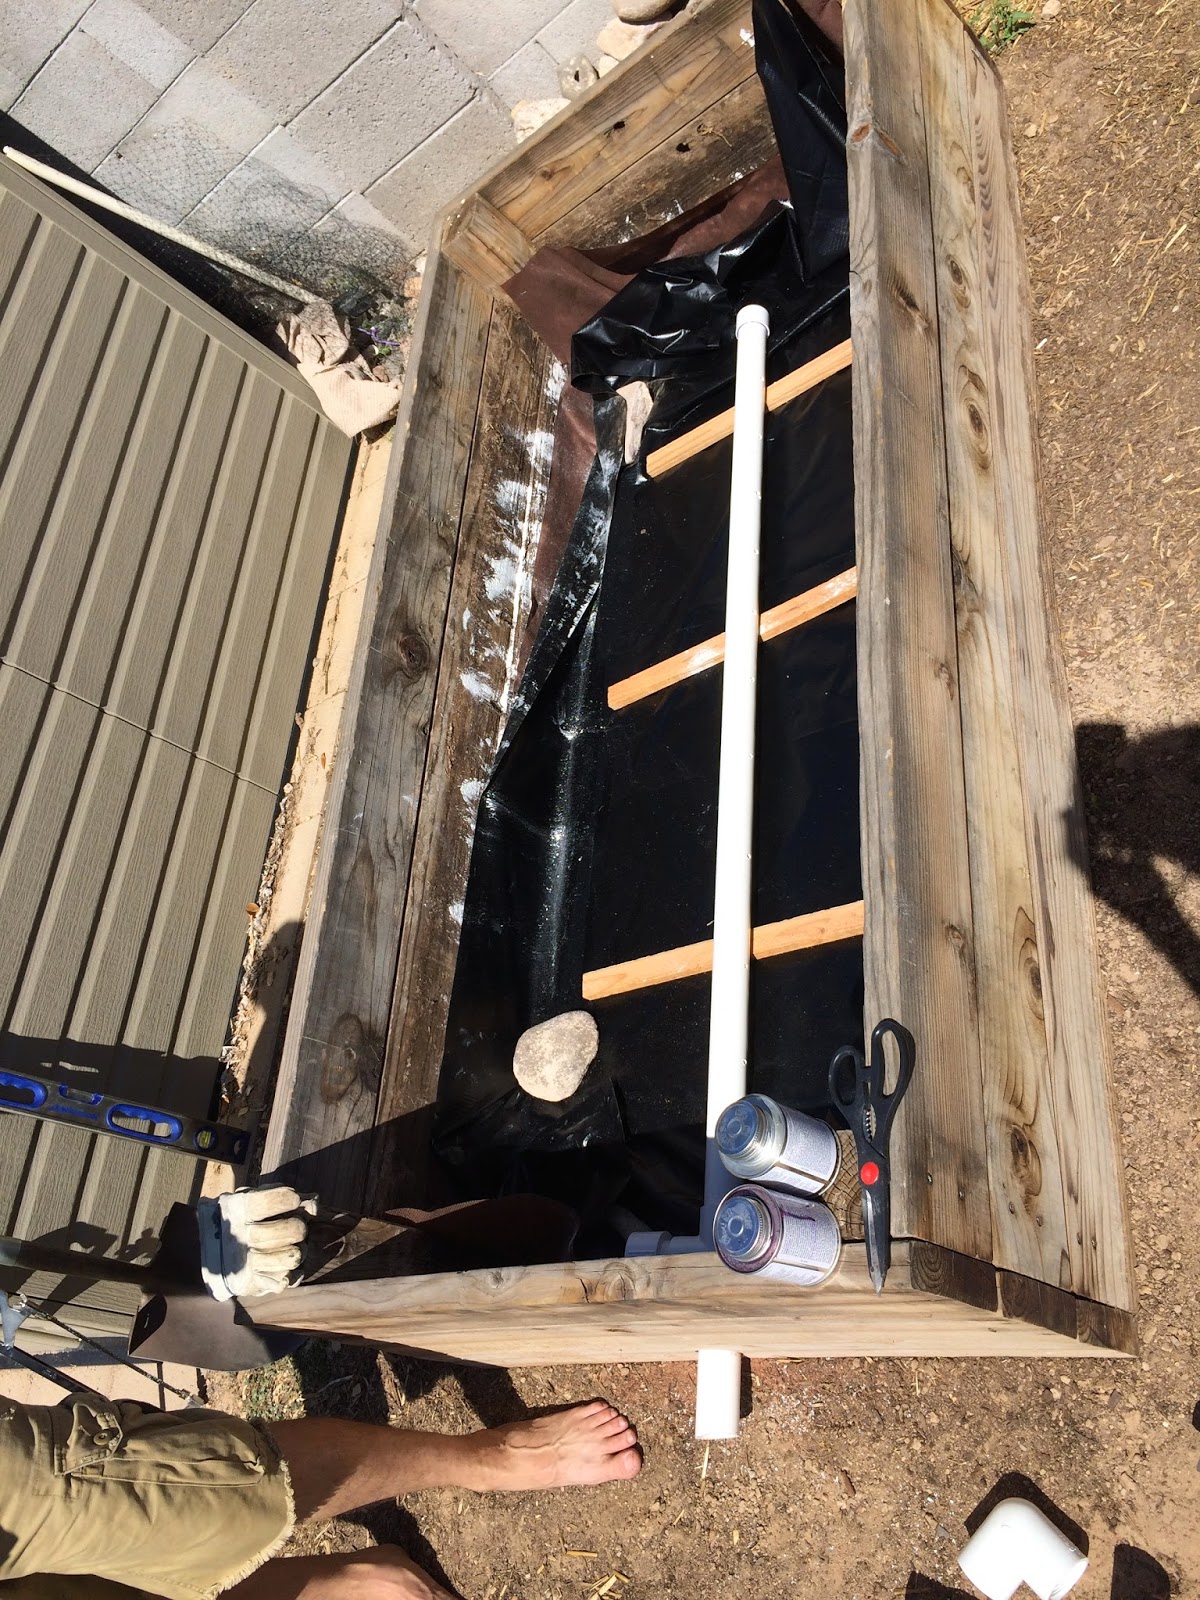
 We put down fabric-type stuff that's used to prevent weeds. It is to protect the pond liner.

 Then we put down the pond liner - this holds the water in the bottom so that it can wick up to the plants.

 Cutting the PVC pipe that will be used for the watering system.

 My man isn't wearing a shirt. There are perks to these projects.

 Had to cut a hole in the box for the PVC - this was before we put another fabric layer down - again, to protect the pond liner.

This is where we made a mistake and connected the PVC to the outside...and realized we didn't put it through the pond liner (and the two fabric liners). Since we were trying to retain water, it was kind of a problem. We had to cut apart the newly glued PVC, go buy a new part, and re-glue it.

 Here it is correctly running through the three liners. We glued it to the liner and used a hose clamp to secure it.

 The wood on the bottom is to keep the PVC elevated a little because the water holes are on the bottom. It would be a bad thing to have the holes clog with dirt.

 The first layer of rock.

 Here's the outside system. The overflow is supposed to be lower so that it indicates when you've filled it enough, but due to the size of the pipe, it was too high.

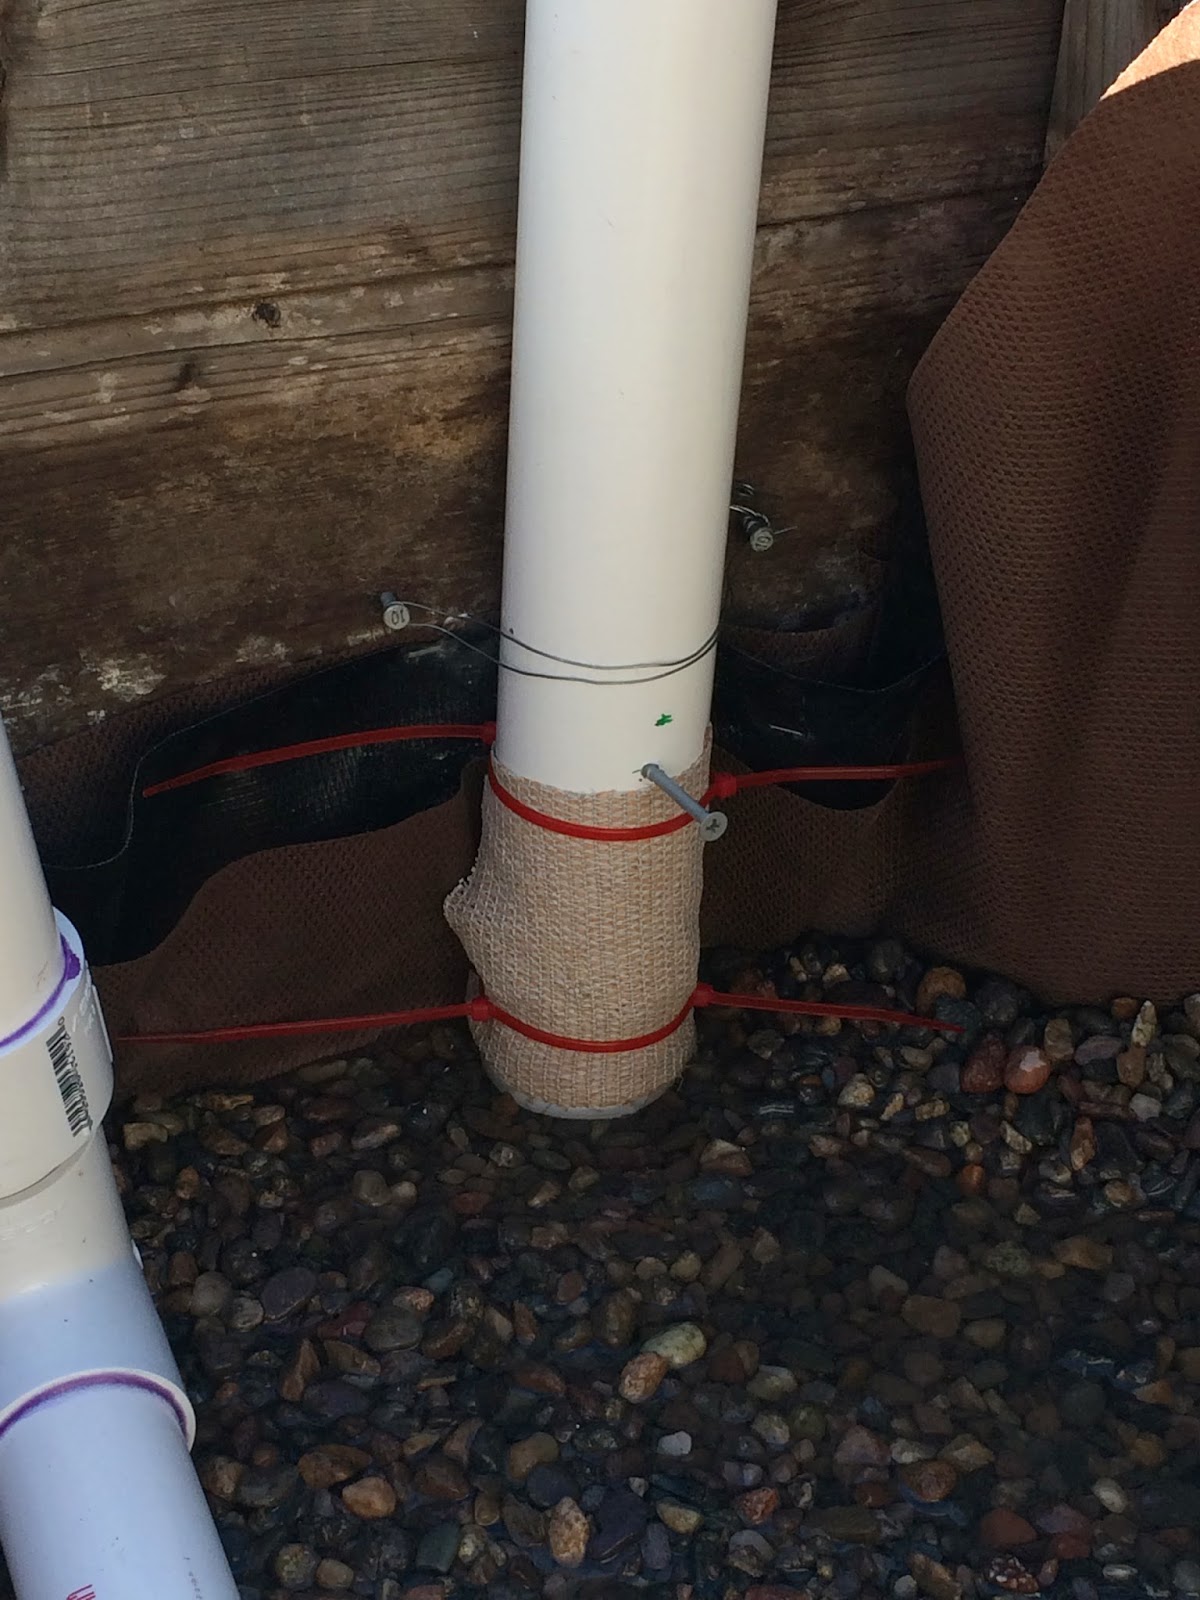
So we made an observation pipe.

 It has a screw to mark when the water is too high. J drilled holes in it, then covered it with cloth that will allow water through but block out the dirt. Very high tech.


 You can see where the hose goes to fill it with water.

 All done. Below the overflow pipe, you can un-screw the end of that pipe to drain it.


It's funny to look through the old blogs and see how much the yard has changed. We've owned the house almost five years now. J still has big plans, so even more changes will be made.

I told him I'm not doing any work outside once it gets hot. I have been lobbying for an above-ground pool, so that will be the extent of my backyard adventures.

The weekend always seems to fly by. Probably because it is chock full of activity. We went to Singh Farms and got a truckload of compost, which meant we had to shovel it out the back of my truck and wheelbarrow it into the backyard (it's usually 9 1/2 wheelbarrows full). We went to a BBQ with friends Saturday night and had a lot of fun. I also got a little spring cleaning crazy and super-cleaned my bathroom, then cleaned out the garage and under my kitchen sink. I also finished a few crochet projects for Danielle's baby photo shoot. I cannot wait until that little baby is here. Especially now that I'm ready for him.

Monday, March 17, 2014

Crochet Newborn Baby Cowboy (Football) Outfit

Danielle and Andrew are Cowboys fans and she found a little crocheted outfit she was going to buy.

It was $28. After shipping and handling it probably would have been $33. I looked at the little outfit and knew I could do it.

I'm cheap. Doesn't $33 for a little outfit the baby will probably wear once seem a bit high?

 Front view

 Back view

 Side of the hat


It's kind of hard to photograph. I can't wait to see it on the little guy. I hope it fits. That's the only thing that can be a little frustrating - babies are different sizes and depending on yarn/size hook/tension, patterns can come out different sizes.

Here's how I made it, in case any crocheters out there want to do it.

Newborn Baby Earflap Hat

Supplies:
Less than ¼ skein worsted weight yarn (I used two colors, Full O Sheep, and a sport weight wool for edging)
5mm (H/8) hook

Abbreviations:
Ch – chain
Dc – double crochet
Sc – single crochet
Sc dec – single crochet decrease

Special instructions:
Sc dec – Pull up a loop in each stitch indicated, yarn over, draw through all loops on hook.

Instructions:
(ch-3 does not count as dc)
Round 1: Magic Ring, ch 3.  10 dc inside ring.  Pull ring tight.  Join to the top ch of ch 3.
Round 2: Ch 3.  2 dc in each dc around. (20 dc) Join to the top ch of ch 3.
Round 3: Ch 3.  *2 dc in first dc, dc in next dc.  Repeat from * around.  (30 dc) Join to the top ch of ch 3.
Round 4: Ch 3.  *2 dc in first dc, dc in next 2 dc.  Repeat from * around.  (40 dc) Join to the top ch of ch 3.
Rounds 5-9: Ch 3.  Dc in each dc around.  (40 dc)  Join to the top ch of ch 3.
At the end of round 9, do not finish off.

Earflap 1:
Row 1: Ch 1. Sc in next 10 dc.
Row 2: Ch 1, turn.  Sc dec over next two sc.  Sc in next 6 sc.  Sc dec over last two sc.
Row 3: Ch 1, turn.  Sc in each sc across.  (8 sc)
Row 4: Ch 1, turn.  Sc dec over next two sc.  Sc in next 4 sc.  Sc dec over last two sc.
Row 5: Ch 1, turn.  Sc in each sc across.  (6 sc)
Row 6: Ch 1, turn.  Sc dec over next two sc.  Sc in next 2 sc.  Sc dec over last two sc.
Row 7: Ch 1, turn.  Sc in each sc across.  (4 sc)
Row 8: Ch 1, turn.  Sc dec over first two sc.  Sc dec over last two sc.
Row 9: Ch 1, turn.  Sc dec over two sc.  Finish off.

Earflap 2:  Attach yarn 7 (Deidre’s note: sl st 5 over) stitches over on the other side of the seam.  (smaller opening for the back of the hat)

Row 1: Ch 1. Sc in next 10 dc.
Row 2: Ch 1, turn.  Sc dec over next two sc.  Sc in next 6 sc.  Sc dec over last two sc.
Row 3: Ch 1, turn.  Sc in each sc across.  (8 sc)
Row 4: Ch 1, turn.  Sc dec over next two sc.  Sc in next 4 sc.  Sc dec over last two sc.
Row 5: Ch 1, turn.  Sc in each sc across.  (6 sc)
Row 6: Ch 1, turn.  Sc dec over next two sc.  Sc in next 2 sc.  Sc dec over last two sc.
Row 7: Ch 1, turn.  Sc in each sc across.  (4 sc)
Row 8: Ch 1, turn.  Sc dec over first two sc.  Sc dec over last two sc.
Row 9: Ch 1, turn.  Sc dec over two sc. 

For white and blue strip:
White: Ch 37
HDC in 3rd CH from end, HDC along (35 HDC)
Sc blue along each end

Stars:
Rnd 1:(Right Side) Starting at center, ch 2, 10 hdc in 2nd ch from hook; join with sl st to first hdc. (10 hdc)
Rnd 2:* Ch 4, sl st in 2nd ch from hook, sc in next ch, hdc in next ch, skip next hdc (on Rnd 1), sl st in next hdc; rep from * around. (5 points) Finish off and weave in ends.
Sew on the stripe and stars.

Diaper cover:

Size H Hook
Ch 45
1) SC in 2nd chain from hook, SC all the way across
2) CH 2, turn, DC across
3) CH 1, turn, SC across
4) Turn, SL ST next 10 sts, CH 2, DC next st, DC, next 23 st, leave rest unworked
5) CH 2, turn, DC across
6) CH 2, turn, DC2TOG, DC 20sts, DC2TOG
7) CH 2, turn, DC2TOG, DC 18sts, DC2TOG
8) CH 2, turn, DC2TOG, DC 16sts, DC2TOG
9) CH 2, turn, DC2TOG, DC 14sts, DC2TOG
10) CH 2, turn, DC2TOG, DC 12sts, DC2TOG
11) CH 2, turn, DC2TOG, DC 10sts, DC2TOG
12-19) CH 2, turn, DC across (do not fasten off).

With white:
Ch1, SC around twice. (Could maybe only do this once.)
With blue:
Ch 1, SC around once.
Fasten off, Weave in ends.
Button or snap in center of the front flap (make sure it can go between the DC) 


Thursday, March 6, 2014

Danielle's Baby Shower

My younger sister Danielle is expecting a baby boy April 7th.

It's so weird to refer to her as Danielle. Growing up she was always Dano the tomboy. Now she dresses all cute and always has her hair and make-up done.

I've been planning the baby shower for awhile now. Pinterest helps but it also creates great pressure. I don't know how those women do those over the top parties.

The baby shower was this Saturday and it was fun but I am glad it is over. I was out of town on a business trip last week before the shower and it was a bit stressful.

Some of the prep for the football-themed shower:

Football soap for the party favor. Pain in the butt to make and very time consuming.


The soap was tiny, so I ended up making over 100. I put five in a bag for the party favors. People thought it was candy at first. That could have been a problem. And I would like to say that the photo above is my very first batch. By the end I wasn't spilling a drop. Except for that one time on batch 9 when I was thinking to myself what a pro I am and how awesome my skills were...and that's when the universe decided I needed to be taught a lesson and I spilled soap everywhere.


A PVC football goal


My lovely Adirondack chairs needed to be painted. Luckily, I still had the old paint and luckier still it was not dried out.

I found these footstools at Goodwill awhile back. Normally these things are pricey, so when I found them (and on a half off day!) I grabbed them up. And had every intention of painting them.


Sometimes a party is all the motivation you need.


 We also did a lot of work to the yard. It was a co-ed shower and I had planned on having outside games - corn hole (or "bags") and ladder ball. We did a TON of yard work. The weekend before the baby shower we pretty much spent the entire weekend pulling weeds. When I closed my eyes I could see weeds. We also moved the rock in front of the grass area and covered it with mulch. J wants to lay an extended patio and has plans for an outside kitchen.

The before:

Do you see these WEEDS?

We also hung some lights, so that the people playing the outside games would be able to see. Another project that I had been meaning to complete.


The after:


That side of the yard still needs a little work. It's a huge yard, ok?

Let's just focus on the nice area. 

The day of the party it rained. And not a typical Phoenix sprinkle-for ten-minutes-and-that's-it rain.

It poured. J the green thumb dirt nerd loves the rain and he was looking out the back door grinning like a fool. He even has a rain meter to measure rain, which he faithfully tracks online. He gleefully informed me that we received 2.35 inches of rain. We live in a desert and that is about 20% of the rain for the year. 20 friggin' percent! On the day of my sister's baby shower!

All of our hard work on the backyard was completely wasted.

But there was a ton of food, people were laughing and talking, and Danielle and Andrew received a ton of gifts, so I considered it a success.


I'm never making cake pops again. Those suckers take forever. They sure were tasty though.

Can you tell it's a football-themed shower?


I forgot to get a shot of the other food table - there was meat, rice, beans, and a ton of other stuff.


In case you can't tell, that is a football helmet watermelon. It's tiny because that's the only kind I could find. Must not be in season. That was crafted by J. He was such a wonderful help all weekend.


This was supposed to be near the street in the front yard, but because of the pouring rain it was on the front porch.


This cake was delicious and humongous. Andrew's Mom has a friend who makes them. Over half of it was left so I took it to work and my arms started to ache because it was so heavy.


I spent the rest of the weekend returning the rented tables and chairs (that were outside, useless, getting wet), delivered the rest of the gifts that wouldn't fit in Dano's (I mean, Danielle's) car, and cleaning my house. My floor was a mess as a result of the rain. Dano offered to help but I didn't want her helping. It's just something a host does.

I felt a little crazy, getting home from the business trip and finishing the prep for the baby shower. No one in my family had better be pregnant anytime soon. I have been taking this week to recover.

And editing maternity photos. Here's a sneak peek.


I love this photo. First of all because Dano looks sassy. Doesn't she look sassy? Plus, I didn't have a blue ribbon - that ribbon is actually green but I edited the photo and made it blue.

I'm just waiting for Dano to take a look at the photos and tell me if she wants anything edited and then they'll be up on FB.

And then I'll make her thank you cards and then I'll crochet her little baby hats and then I will take photos of the newborn baby. Cross your fingers for me that they turn out alright. I'm sure it's an adorable baby. Just look at the parents.

And then I will be taking a vacation somewhere. Anywhere.