Showing posts with label Project. Show all posts

Sunday, March 23, 2014

Wicking Garden Bed

Joseph has two raised garden beds. (Some blogs here and here).

He recently informed me that he wanted to move one. I don't know why, I just do as I'm told (well, that's not really true...but I don't mind helping my Love with his projects since he is so wonderful at helping me with mine).

Since he was moving it anyway, he informed me he wanted to turn it into a Wicking Garden Bed.

Basically, you water it from the bottom and it wicks up. Sounded kind of weird to me, but J assured me that it is superior to watering it the regular way.

The things my dirt nerd decides he's going to do. I love it.

Here's one of the online websites that shows you how to build it:
http://www.mvcc.vic.gov.au/for-residents/environment-programs/my-smart-garden/~/media/Files/ForResidents/Environment/My%20Smart%20Gardens/Wicking_Bed_Fact_Sheet_Feb%202012.ashx


 The pile of dirt there is where the garden box used to sit, next to the other garden box.

 The box's new home, next to the shed.


 We put down fabric-type stuff that's used to prevent weeds. It is to protect the pond liner.

 Then we put down the pond liner - this holds the water in the bottom so that it can wick up to the plants.

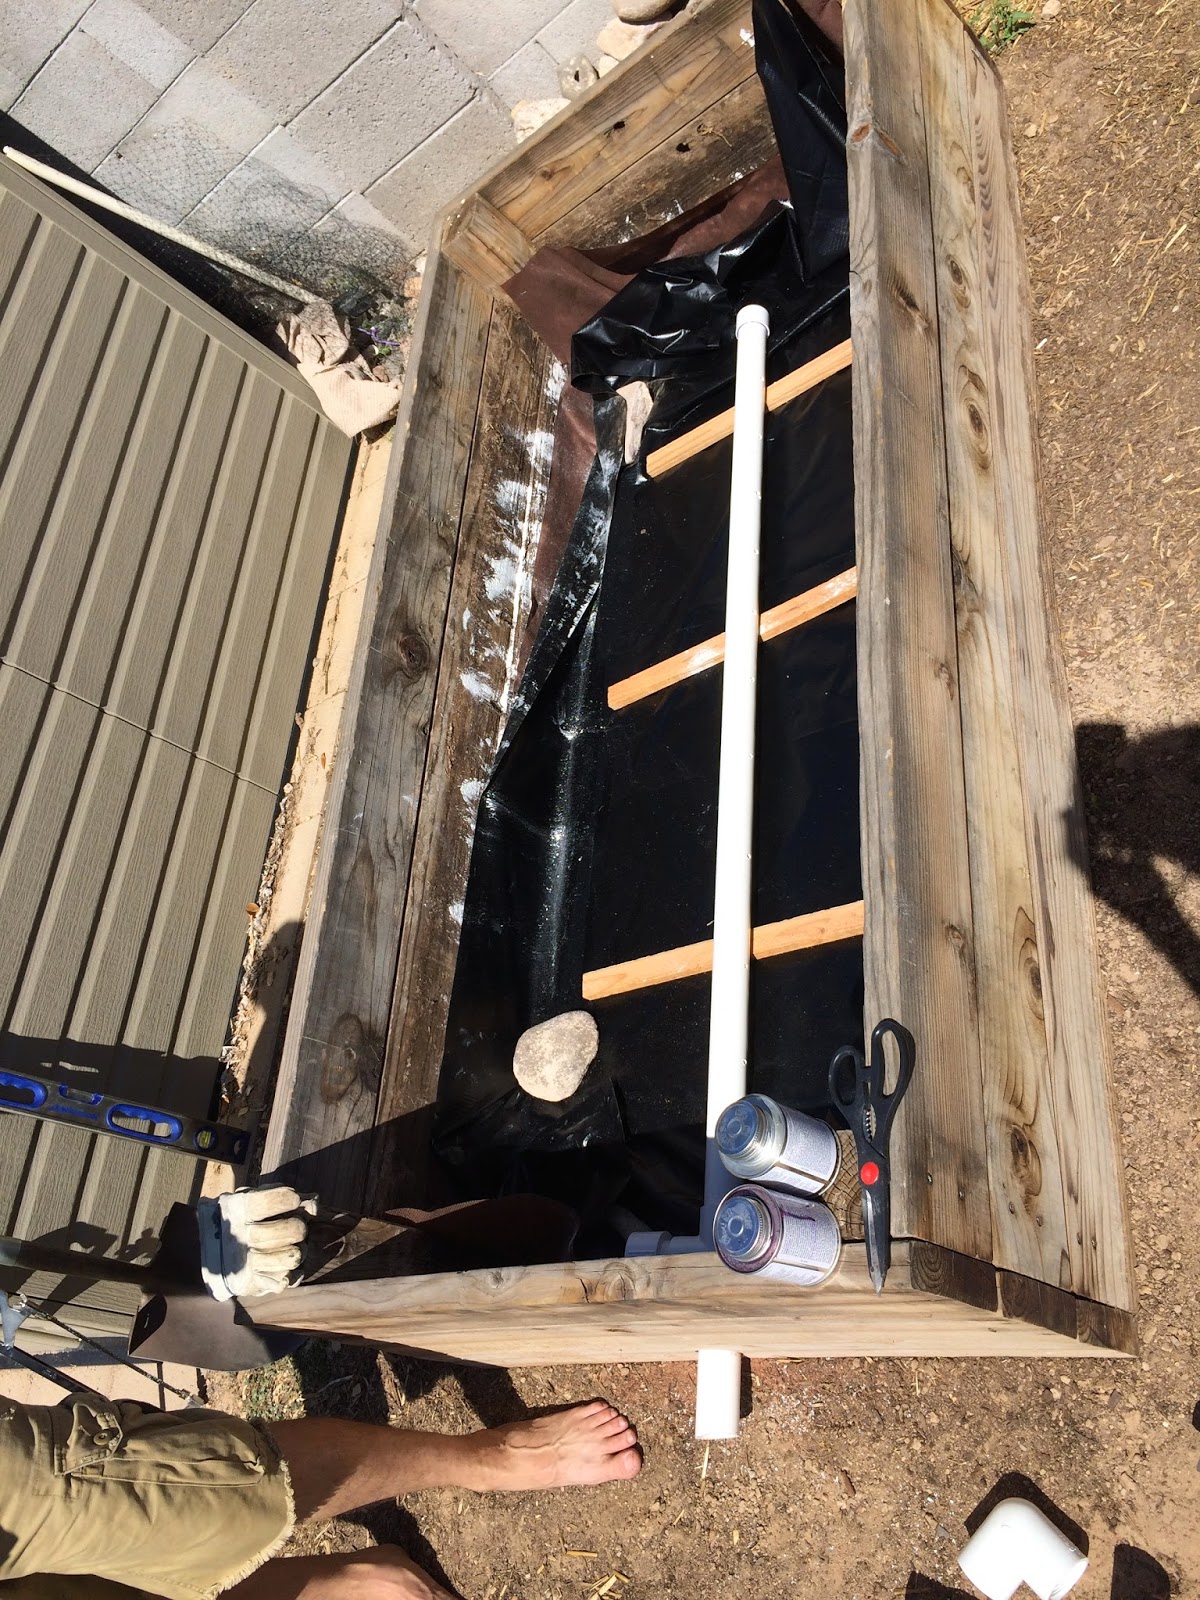
 Cutting the PVC pipe that will be used for the watering system.

 My man isn't wearing a shirt. There are perks to these projects.

 Had to cut a hole in the box for the PVC - this was before we put another fabric layer down - again, to protect the pond liner.

This is where we made a mistake and connected the PVC to the outside...and realized we didn't put it through the pond liner (and the two fabric liners). Since we were trying to retain water, it was kind of a problem. We had to cut apart the newly glued PVC, go buy a new part, and re-glue it.

 Here it is correctly running through the three liners. We glued it to the liner and used a hose clamp to secure it.

 The wood on the bottom is to keep the PVC elevated a little because the water holes are on the bottom. It would be a bad thing to have the holes clog with dirt.

 The first layer of rock.

 Here's the outside system. The overflow is supposed to be lower so that it indicates when you've filled it enough, but due to the size of the pipe, it was too high.

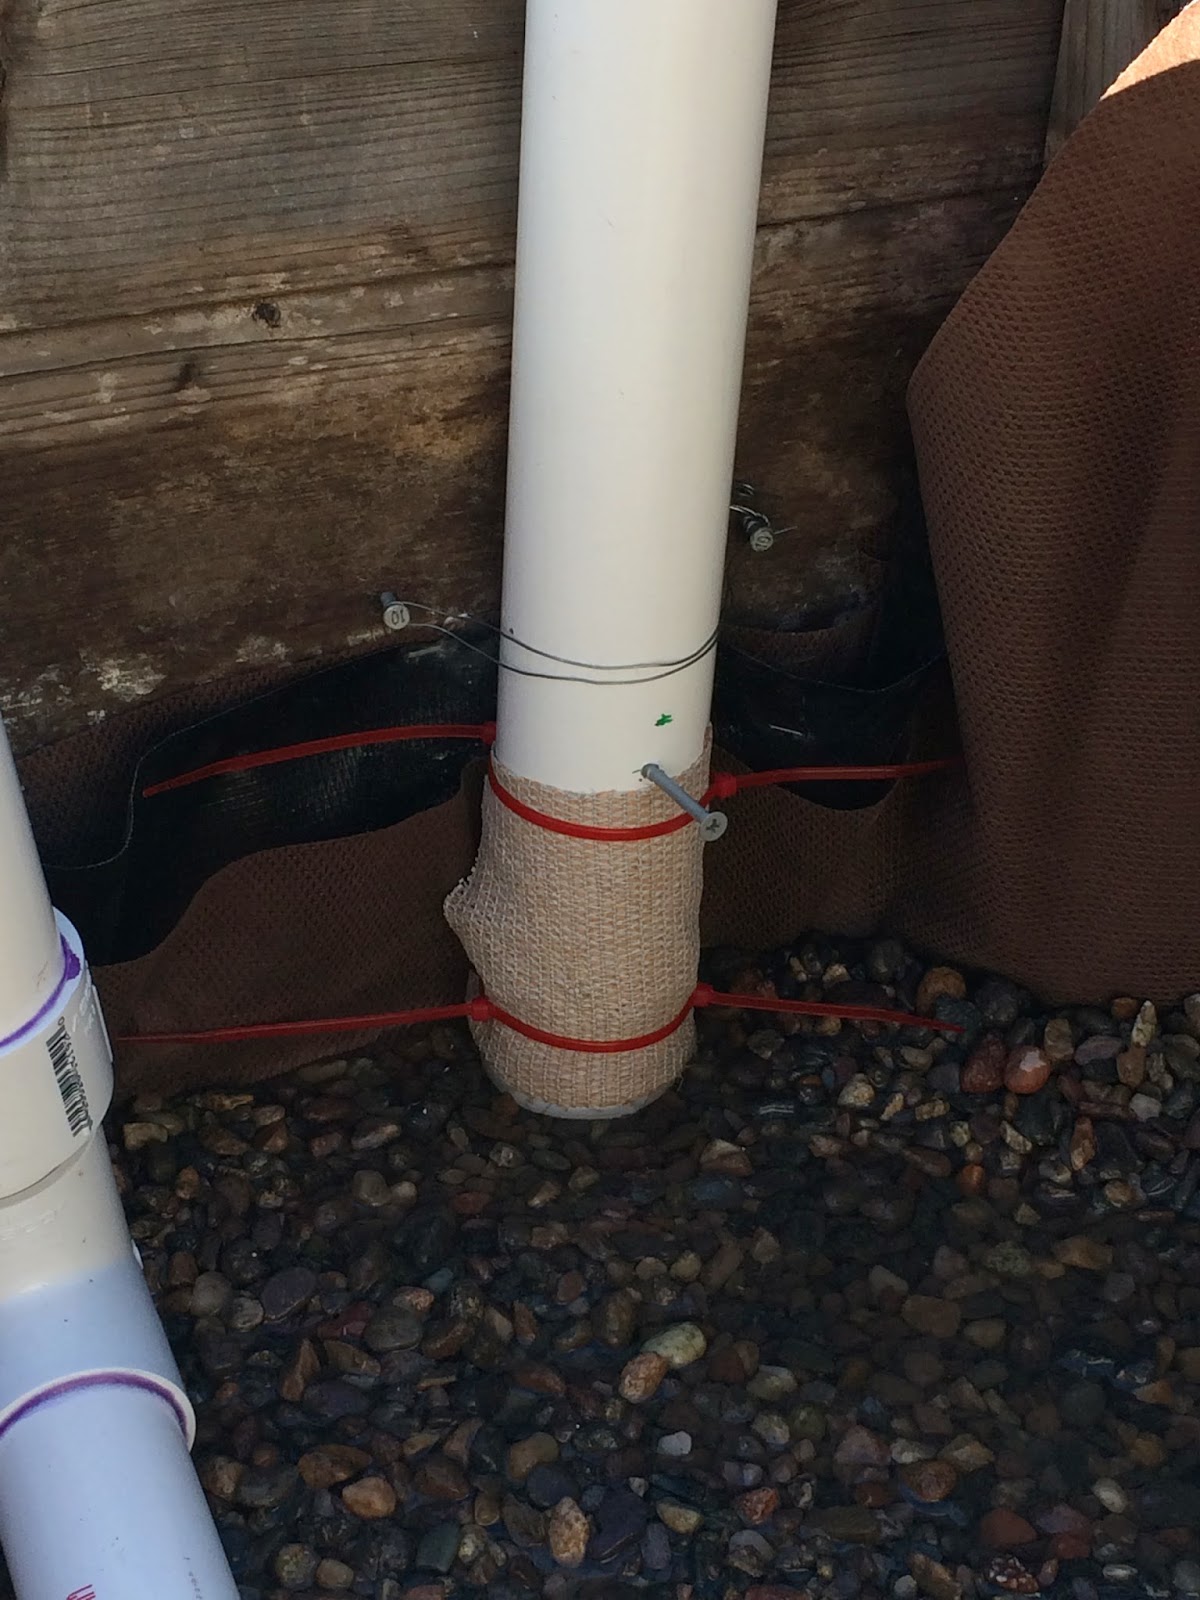
So we made an observation pipe.

 It has a screw to mark when the water is too high. J drilled holes in it, then covered it with cloth that will allow water through but block out the dirt. Very high tech.


 You can see where the hose goes to fill it with water.

 All done. Below the overflow pipe, you can un-screw the end of that pipe to drain it.


It's funny to look through the old blogs and see how much the yard has changed. We've owned the house almost five years now. J still has big plans, so even more changes will be made.

I told him I'm not doing any work outside once it gets hot. I have been lobbying for an above-ground pool, so that will be the extent of my backyard adventures.

The weekend always seems to fly by. Probably because it is chock full of activity. We went to Singh Farms and got a truckload of compost, which meant we had to shovel it out the back of my truck and wheelbarrow it into the backyard (it's usually 9 1/2 wheelbarrows full). We went to a BBQ with friends Saturday night and had a lot of fun. I also got a little spring cleaning crazy and super-cleaned my bathroom, then cleaned out the garage and under my kitchen sink. I also finished a few crochet projects for Danielle's baby photo shoot. I cannot wait until that little baby is here. Especially now that I'm ready for him.

Monday, November 18, 2013

How to Remove Tile...Hint: Just Pay Someone

So...since we're getting new flooring (wooot!!) because the car hit our house (post here), I jumped on my chance to get new kitchen flooring.

Back when we remodeled the kitchen (post here), I brought up replacing the floor. Joseph shut that down hard and fast. Joseph doesn't usually shut me down, so the few times he does, I usually don't fight it. I figured I could live with it and/or we would do it eventually.

The time has come. We went back and forth about potential problems with laminate wood in the kitchen. I dumped water on the samples and let is sit overnight and they all looked fine. I'm going for it.

We got a quote and it seemed a little high. We asked him to break it down and it's not that he was charging more per square foot (I can see exactly what he's charging for the rest of the home because of the insurance paperwork), he just had a ton of stuff to tack on - quarter round, a t-something that may or may not be used (because my house goes in a circle, so it depends on how the floor meets), add on tax and profit and it really added up.

So I decided to save myself $500 and remove the tile myself.

Only problem with my plan is that J is having a busy streak. Because of the nature of his work, he has ebbs and flows, and the work is definitely flowing. Which is good, but also a bit stressful for my Love. And stressful for me, since I got to tear up the tile myself.


Don't judge my wreck of a house. They tore up the flooring everywhere else. Which is why I was trying to hurry and bust the tile out. I didn't want to hold anything up.


Do you see all of the thinset that was left after the tile was removed? I thought removing the tile was hard...nothing compared to scraping that.

But I figured out a rhythm and was able to remove the tile pretty quickly.


First you have to angle the chisel so that it is almost parallel to the floor and smash out the grout.


Once the grout is smashed out, tilt the chisel up to about a 45 degree angle to the floor and pound until you can tell that it is under the tile - you can tell by the vibrations.


Once it's under the tile, angle it back parallel to the ground and get it all the way under the tile. Don't just try this first; you won't get it under the tile and the tile will chip up and pieces will hit you in the face (did I mention it's important to wear safety goggles?).


Then take the rotary hammer with the nice chisel attachment and tear up the thinset.

This is what took forever. It was not a fun week. I would come home from work and work on the kitchen, and then go to bed (usually pretty late). Of course, I got it done last week and I still have no floor....so I guess I could have taken a little more time.

The rotary hammer took up most of the flooring. There were a few ridiculously stubborn spots that were just not coming up. My friend Shawn Ryan let me borrow his jackhammer type tool; we had to borrow his air compressor. That worked like a charm. If you angled it the wrong way you would actually chip up the cement slab it was so powerful.


But it's nice that it's done.


And it's nice to not have a layer of thinset dust in my hair anymore...although it was getting some great volume. But that stuff wasn't just in my hair...we did a major house wipe down and clean up. Even though I still have no floor and stuff is just kind of thrown everywhere, we tried to clean up as best as we could. I cannot wait until my floor is in and I can go through and put things back where they belong.

Thursday, October 31, 2013

Crocheted Costumes

I love to sit in front of the TV and crochet.

I've been talking about going to a gym, but who has time when I have projects?

Some past projects:

Baby shower gifts for Nicki

Baby Bunny Photo Prop

Rug out of Sheets

Baby Blankets

My friend Asmahan had a baby recently and she asked if I could make a candy corn costume she saw on pinterest. It was just a cocoon and a hat, not hard at all.


She has the cutest little baby.


The candy corn was a pretty easy project, and I'm glad Asmahan liked it (the sweetie pie got me a gift card to a restaurant, I really appreciated that). 

My second project was just for me. I was so excited to find a free pattern for a mermaid tail. I am crazy about mermaids. They must be gaining popularity because I have found three different free patterns now. I was really excited when I found the third pattern, because it used a special stitch that made it look like scales.

The pattern can be found here. I started the project and sat down to watch some TV. I usually re-watch Friends or the BBC Pride and Prejudice (it's eight hours long) because I am looking at my project the majority of the time and miss parts. I am currently watching Xena. It's incredible cheesy but we used to watch it with my Dad when we were kids, and it's good crochet TV because I don't mind missing parts. It's a lot of fighting scenes where she is flying through the air and kicking butt.

So I sat through three Xena episodes which meant I had spent two hours on this project when I realized....the maker of the pattern was using UK abbreviations. Which are dumb. A DC in UK means single crochet, but in the US it means double crochet. A TR in UK means double crochet, but but in the US it means triple crochet. (Which one makes more sense to you?) So I was making it too big but I didn't figure it out until I had done the entire top band and gotten to the scales.


So I pulled it apart, pouted a bit, and started again.

Then I got to the bottom fins.


Yeah, that's not right at all. The stinker switched to US abbreviations. I thought her DC meant to single crochet, but it really means DC which means it was TOO SMALL. I briefly considered just leaving it, but it looks like a seal. I had to take a little break from the project at this point.


But once it was finished it was GLORIOUS. I love it. I don't even have a baby to put in it but I love it.

I do, however, have friends with babies.


This is Nicki's little Harper. She is the perfect mermaid. Nicki said she was kicking her legs and flapping the fin and it was adorable.


I handed my phone to J and he swiped to look at the other pictures and was surprised to find this picture:


His reaction was very comical. I had to explain that when I texted Nicki to ask if she wouldn't mind putting her little girl in my mermaid tail, Nicki texted me back with this picture. He looks great too.

And I want one of those tails. I wonder if you can swim in it.

Wednesday, February 13, 2013

Kristi's Project

My sister Kristi has been telling me I need to help her with a couple projects for awhile now.

I am more than happy to help, but you have to put something on my calendar. (I blame the delay on you, Kristi.)

We finally made a date to get together this Saturday. Her dresser is sitting in my kitchen, primed and ready for paint (it probably took an hour to tape it off and five minutes to spray the primer on it). The other project she wanted to do involved my Silhouette machine.

This is a modern style coffee table. I really didn't help with this at all except show Kristi how to use my Silhouette software. The design is completely hers. And she did all the painting.

That is my kind of project...where someone else does the work and I can blog about it.


Here is the section she painted pink. The cut-out shapes are from my Silhouette machine. Then she painted the whole thing black.

Isn't it lovely?

The weather wasn't really cooperating. The day we actually get together to do a project is the day it rains in the desert. So we'll finish the dresser this coming weekend.

It was fun going to the paint store. The two guys there (TWO) were totally flirting with Kristi. One of them gave her a whole bunch of stir sticks and one of those can opener things....for free. Yeah, yeah, stir sticks are free, but I'm pretty sure those can opener things are like....two dollars.


Wednesday, February 6, 2013

Dirt Sifter

Last weekend we planted some more trees for J. They are just little trees, hardly more than twigs. I hope they make it through the frost, because J has informed me that if they die, he is planting more trees.

Heaven help my back.

We had to dig a hole (obviously), but then we had to put the dirt through our dirt sifter to get out the large rocks so we could use the sifted dirt to plant the tree.

Our dirt sifter held up well over the years, but alas, it has died.


The original sifter was just wood screwed together with chicken wire stapled to it. We wrapped the chicken wire around the wood and stapled the heck out of it, but there were a few times I had to go back and do some more stapling because it was pulling out.

So I did a little research and a little planning and created a new, improved dirt sifter.


We used wood glue and brackets in addition to the screws.


I wanted handles this time for easier lifting.


I was hoping to find longer metal pieces, but these will do the job.


We wrapped the chicken wire up the sides and stapled it.

I still want to cut out the handles so that it's easier to carry, but it's usable now.

J has wanted the rock removed from his garden area, and he has also created some large rock piles as he has moved rock around over the years. We got a couple quotes to have rock removed from certain areas, and hired a guy to come out. He took the first load to the dump and said it cost a lot more than he anticipated. He didn't finish the job, so I wasn't very happy, but we weren't going to make the guy work a job at a loss. Plus, J said he doesn't want to make a habit of making enemies with people who know where we live.


These areas used to be covered in rock. There is still rock in the back corner, but J said we'll just take care of it.


Do you see the tiny little stick trees? The one in the middle is one of the new ones. The other two were planted last year. The other new one is on the other side of the yard.


This area between the arbor and the shed was an area where J had been dumping rock, so it had been a huge pile. I can't complain with the amount of work that was completed, so I don't feel too cheated.

That black thing partially in the photo is J's composter. I can't remember if I mentioned that he got that for Christmas. He was really excited about it. I don't really get it, but it was nice to make him happy.

Tuesday, September 4, 2012

Labor Day and a $26 Ottoman

Here is the ottoman I found at Goodwill for $10. You can tell that the faux leather is completely cracked and the bottom is pretty scratched up. But I saw the potential.


Kristi and I took it apart and got to work.


She took the bottom piece and painted it while I took the top piece and re-upholstered it. Then we got together on the glorious holiday that is Labor Day and finished it.

But first we had some baby shower favors to make.


I am so glad these two helped me. This project would have sucked otherwise.


It was Kristi's idea to tie the bags with little rubber bands (the tiny hair bands) and add the cute little babies on the front. She is a creative genius.


I made that up myself, hehe. Pretty proud of that. Those are bath salts, in case you can't tell.


In order to do the buttons, we had to buy a wicked long upholstery needle.


There were only six buttons but I am pretty sure it took an hour. You don't even realize how hard it is to stick the needle back through and get it through the tiny hole in the board. I've done this twice before when making headboards (found here and here) and it's still not easy. At one point my mom and dad both tried to help, and they can vouch for me that it is not as easy as it sounds. I ended up sticking myself and bleeding three different fingers, because you have to feel around and go by touch, and you tell it's finally through when you bleed all over the new fabric.


But it looks fabulous. $10 plus $16 in materials - you can't beat this $26 ottoman.